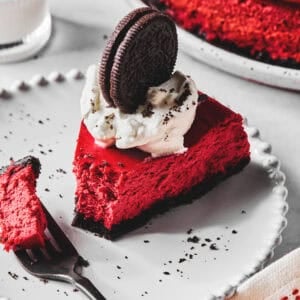
Red Velvet Cheesecake Recipe
This post may contain affiliate links. Please read our disclosure policy.
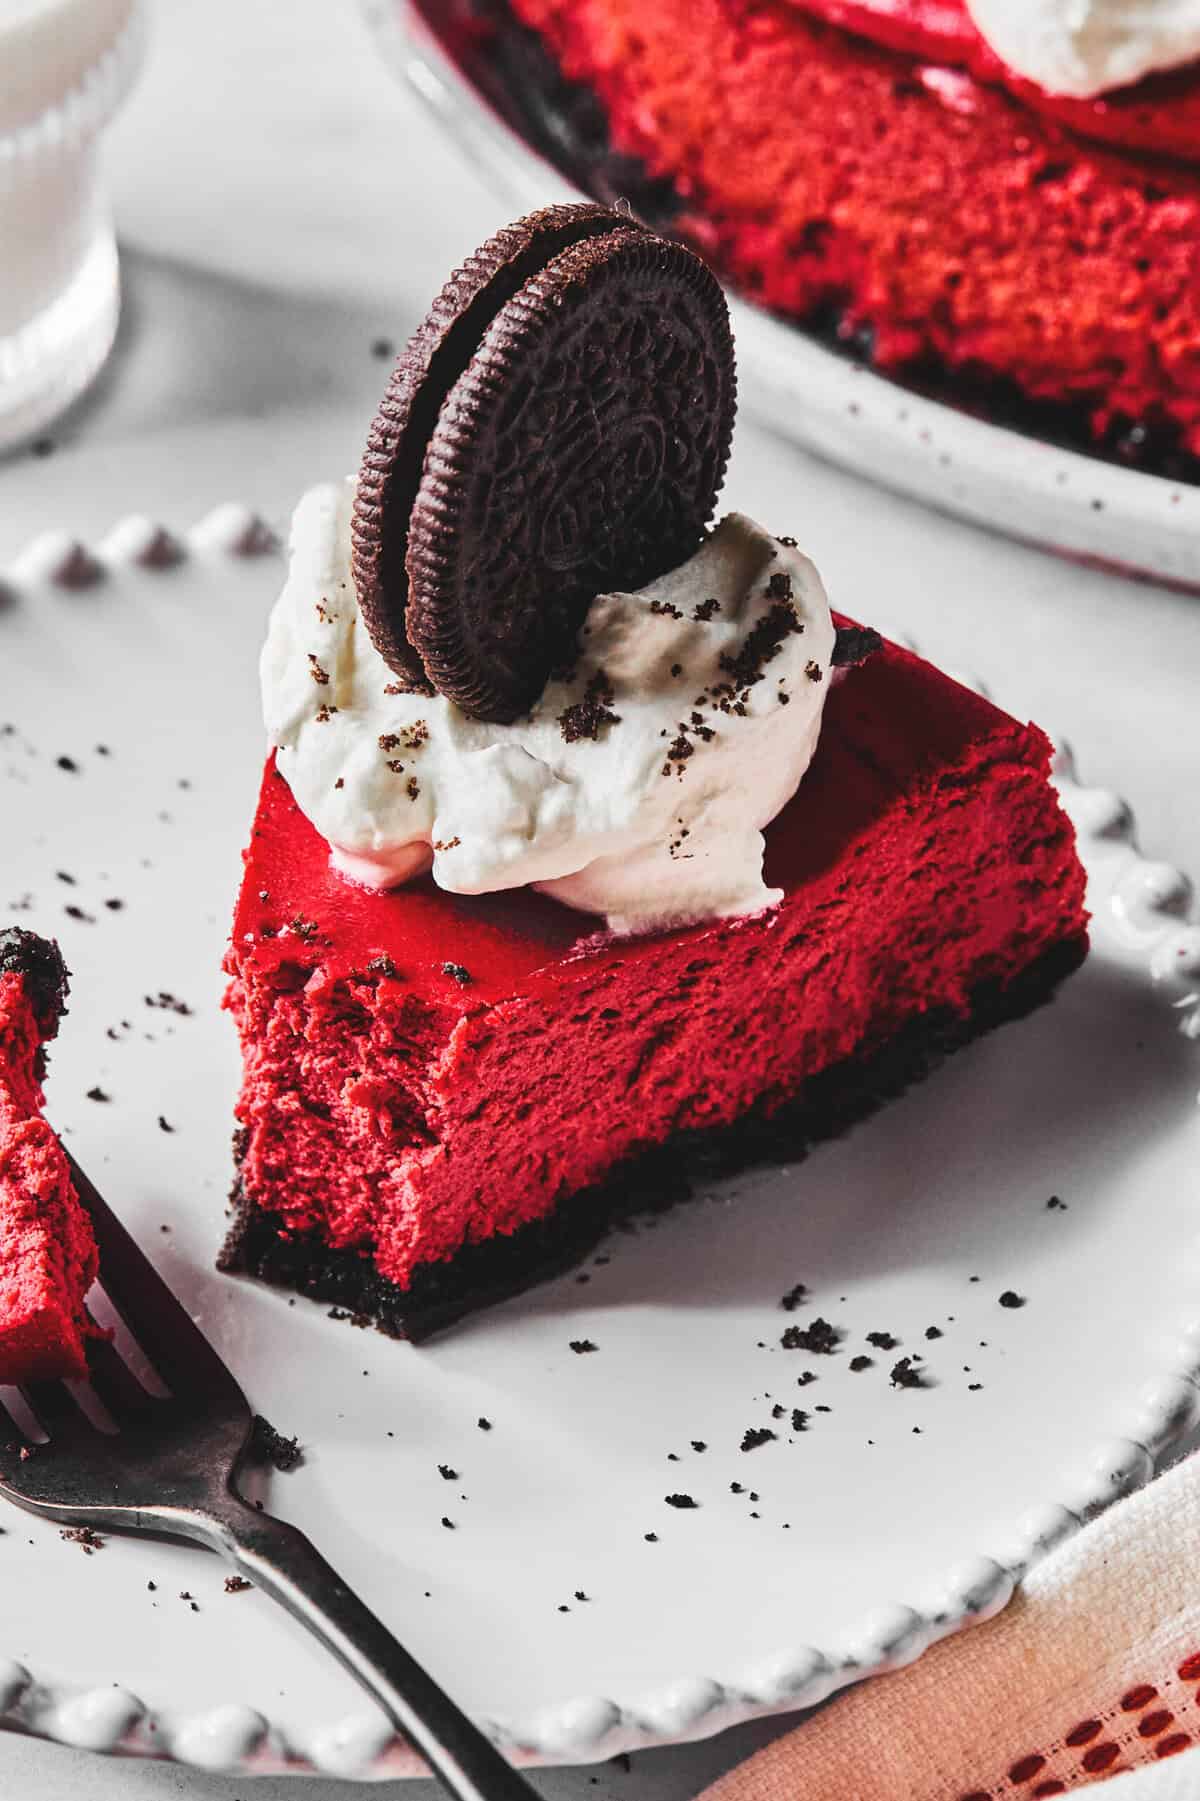
Think red velvet cake, but richer, creamier, and a little more luxurious. This Red Velvet Cheesecake delivers that classic flavor you love in a smooth, decadent form that feels perfect for holidays, birthdays, or anytime you want to bake something special!
If you love red velvet desserts, you’ll also love my Red Velvet Cheesecake Bites, Red Velvet Cake, and Red Velvet Cookies.
Why This Recipe Works
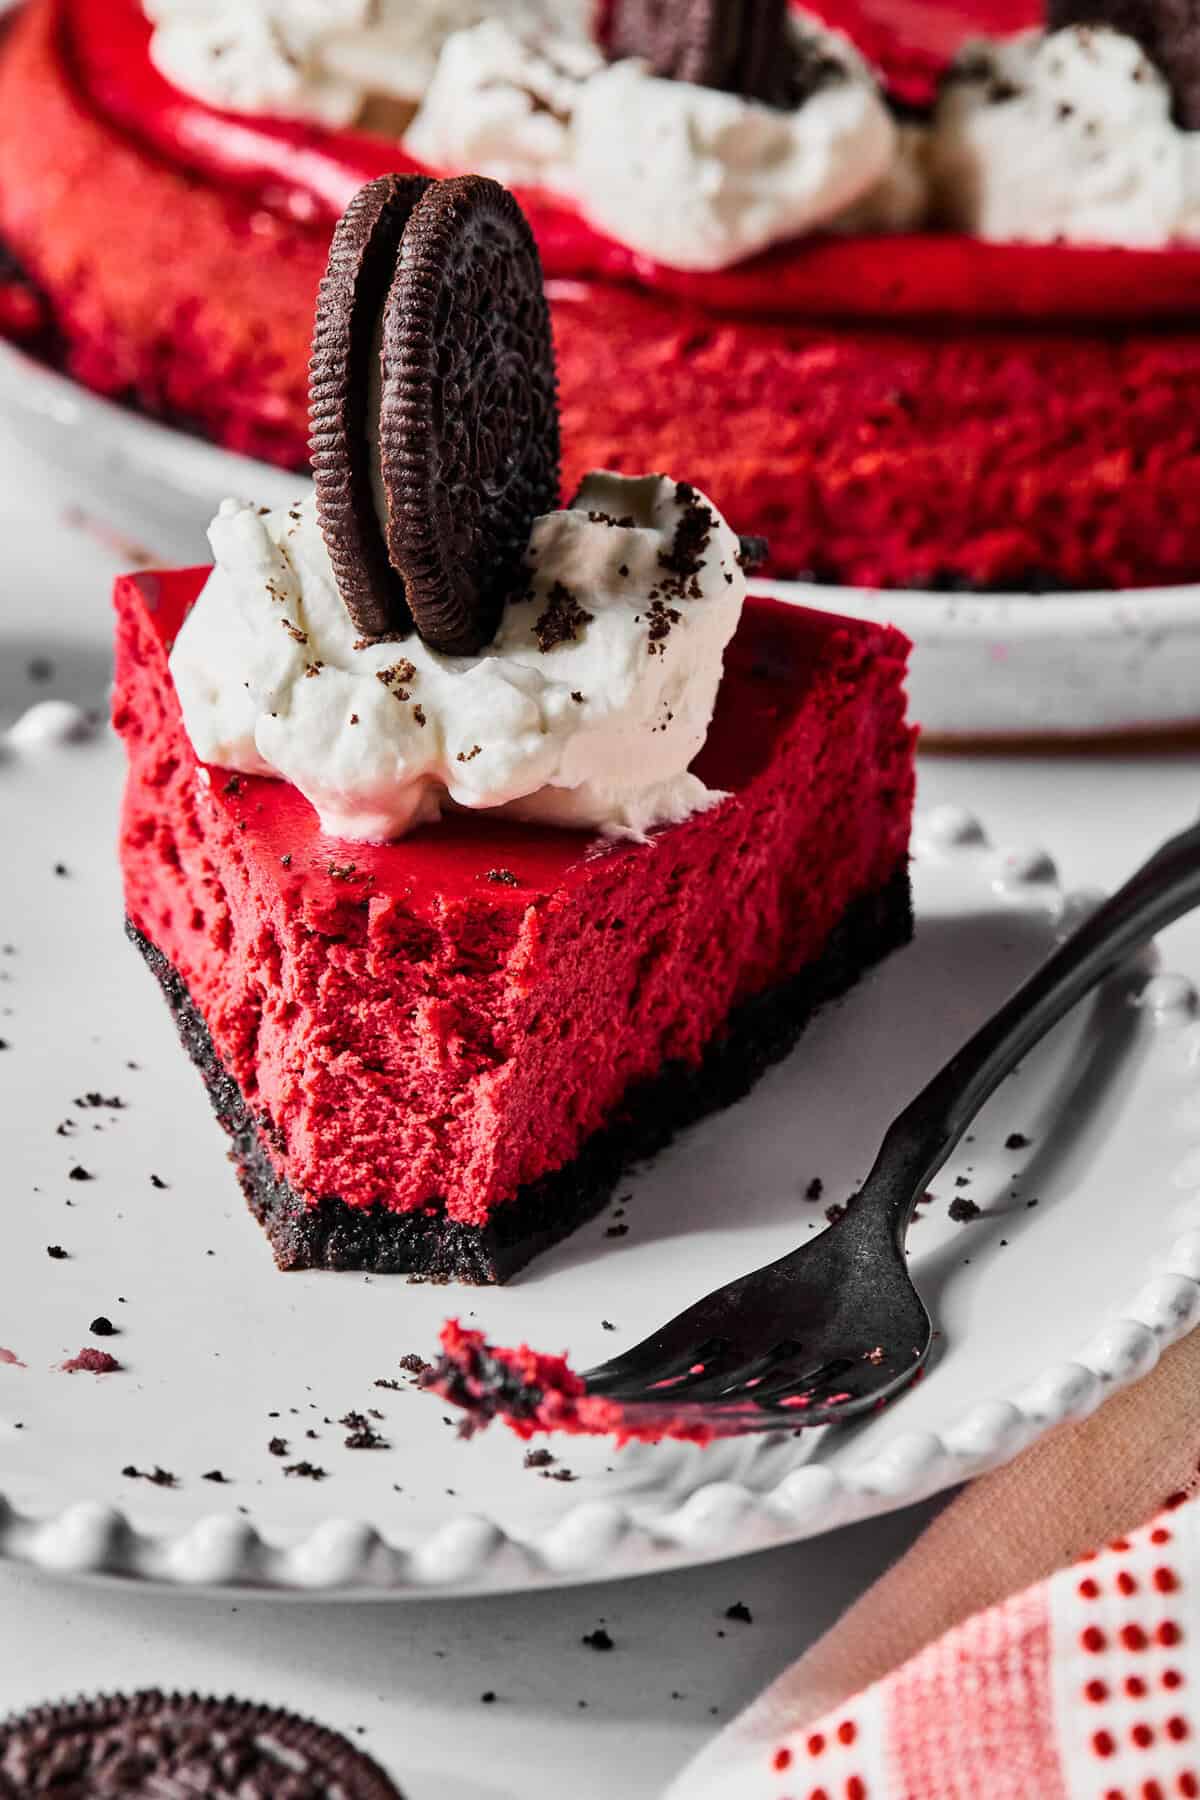
Oreo crust = instant upgrade. Instead of a traditional graham cracker crust, crushed Oreos bring extra richness and a deep cocoa flavor that pairs perfectly with red velvet. It’s chocolatey, buttery, and the ideal base for a creamy cheesecake filling.
Just enough cocoa for true red velvet flavor! Red velvet should taste subtly chocolatey, not like a full-on chocolate cake. The sifted cocoa powder adds depth without overpowering the classic tangy cheesecake flavor.
Room-temperature ingredients keep it smooth. Softened cream cheese, eggs, and heavy cream blend together easily, giving you a silky batter without lumps. This is key for that luxurious texture in this easy red velvet cheesecake recipe!
Slow baking and cooling prevent cracks. A low oven temperature, water bath, and gradual cooling help the cheesecake bake evenly and stay beautifully smooth on top, no cover-up whipped cream required!
Ingredients
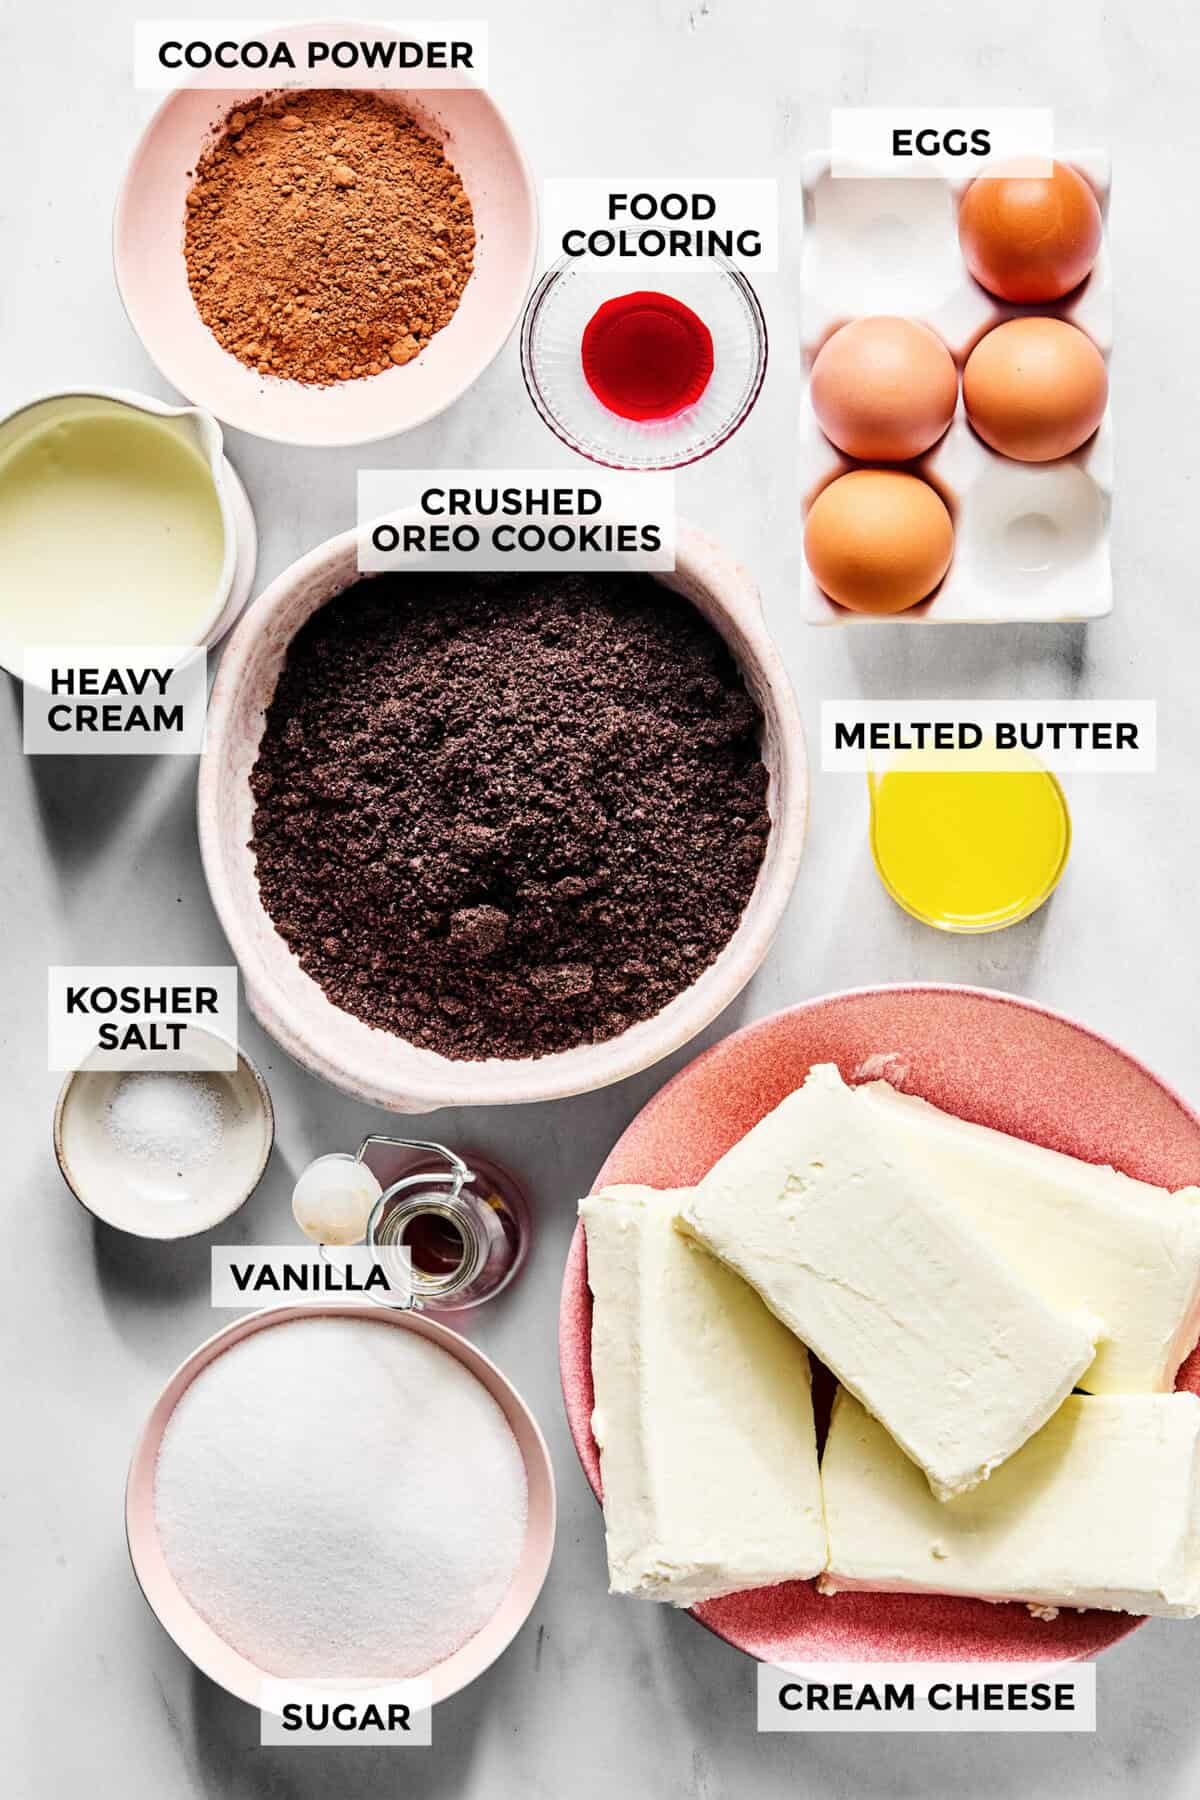
For the Oreo Crust
- Crushed Oreo cookies: Create a rich, chocolatey crust with zero extra sugar needed (since they have plenty of sugar already in them!).
- Melted butter: Binds the crumbs together and adds moisture.
- Kosher salt: Balances the sweetness!
For the Red Velvet Cheesecake
- Cream cheese: The foundation of the red velvet cheesecake! Full-fat and softened is best.
- Sugar: Sweetens the filling without overwhelming the cocoa flavor.
- Vanilla extract: Adds warmth and rounds out the flavors!
- Cocoa powder: Gives that signature red velvet depth without making it chocolate cheesecake.
- Red food coloring: Provides the iconic color! Just add gradually for the perfect shade.
- Heavy cream: Keeps the cheesecake rich and creamy.
- Eggs: Help set the cheesecake and give it structure.
- Kosher salt: Just a small pinch sharpens all the flavors.
How to Make Red Velvet Cheesecake
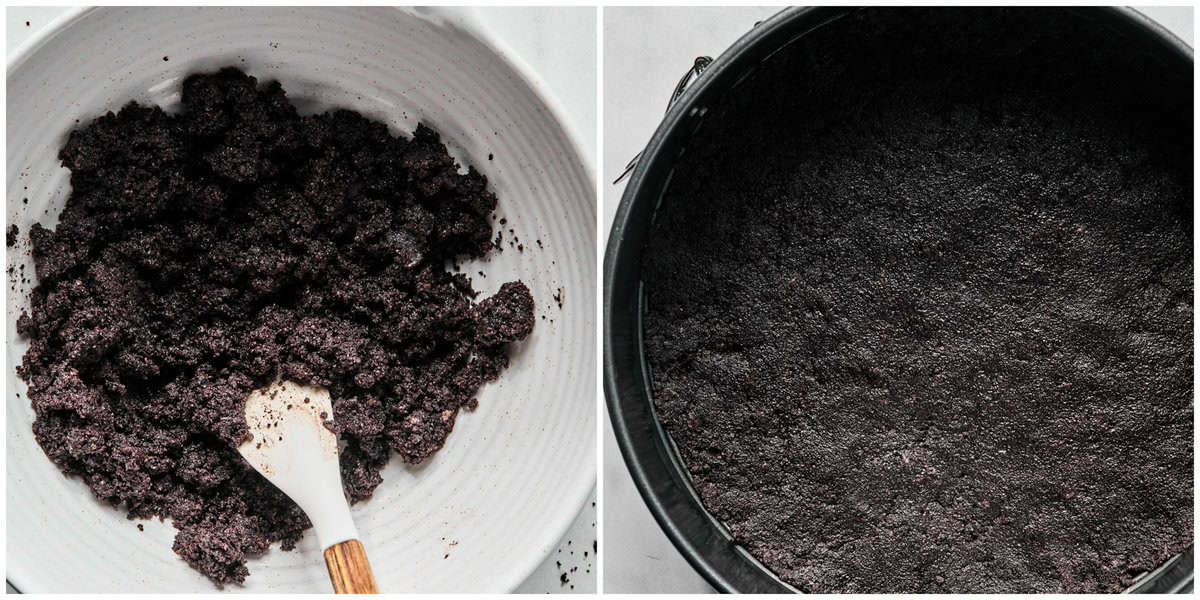
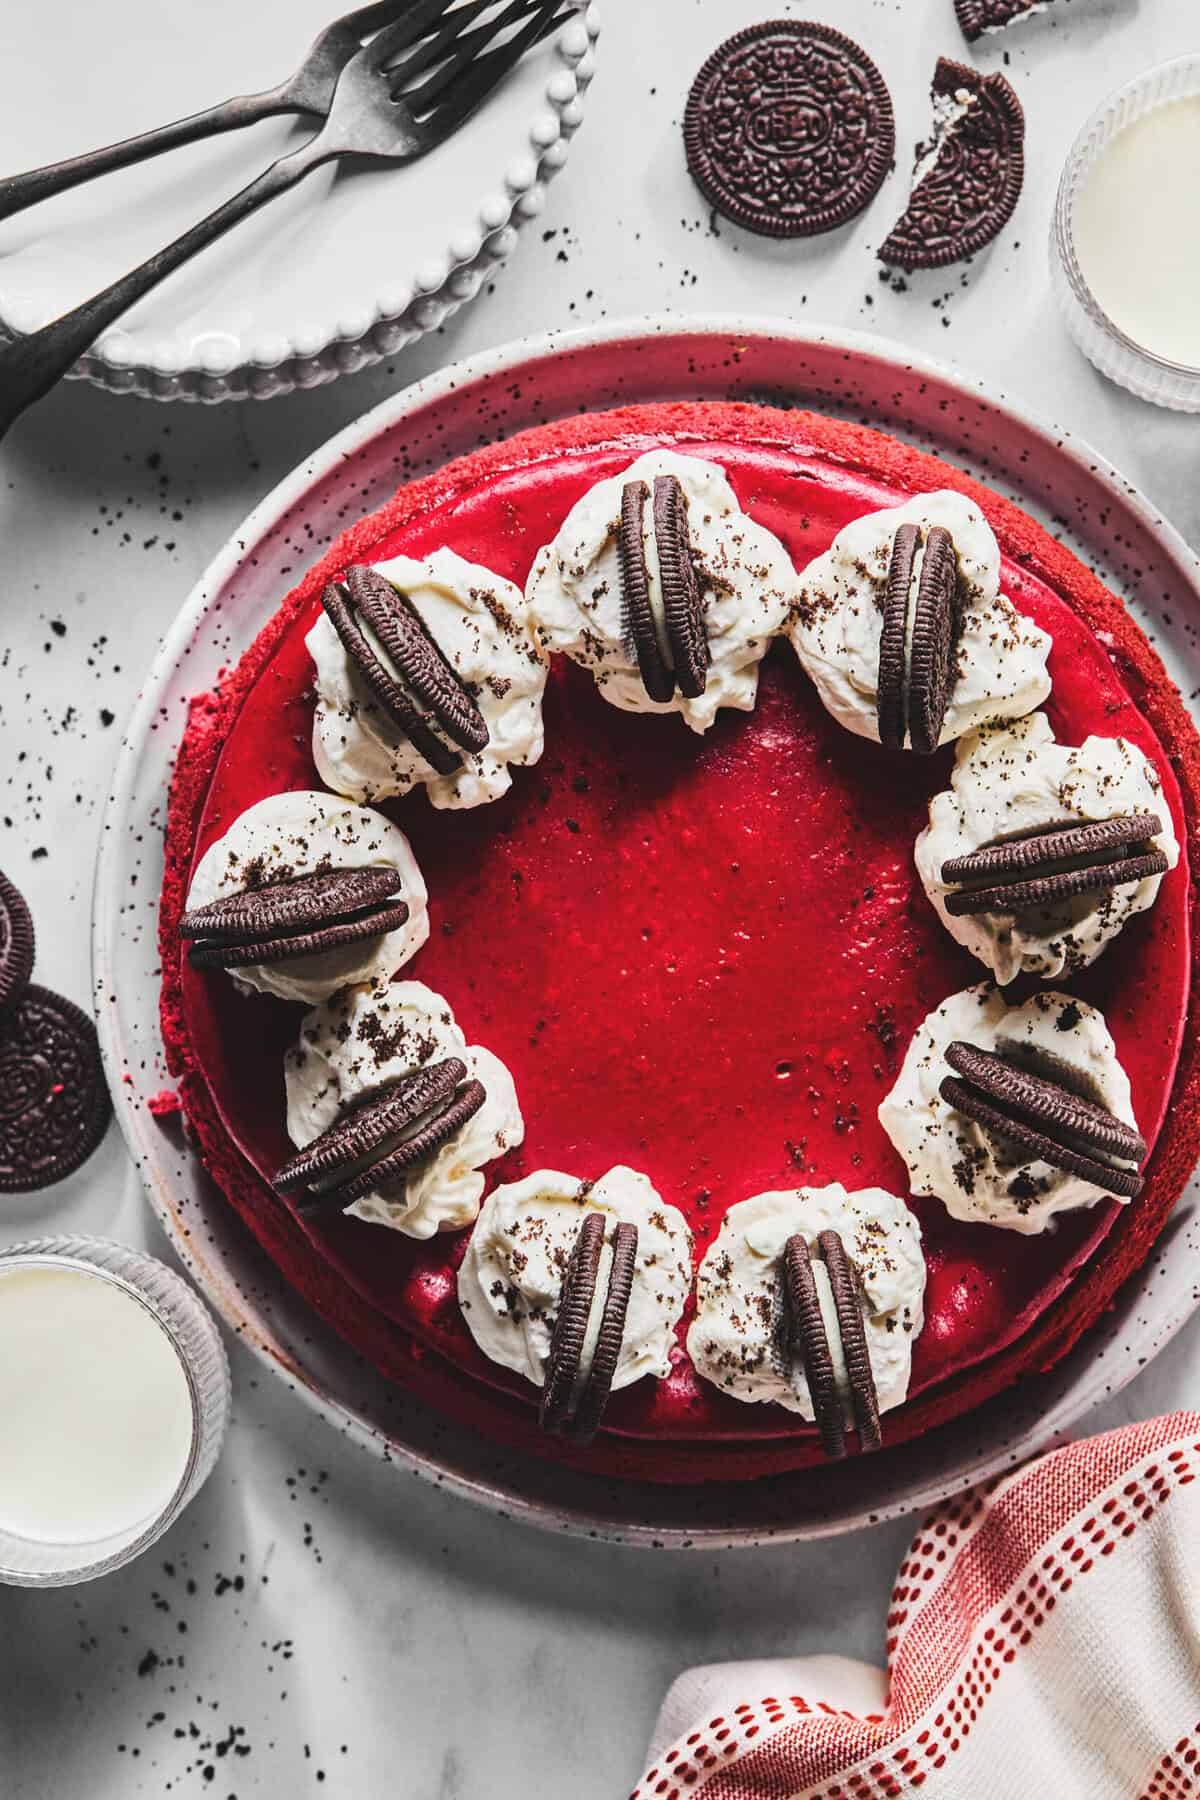
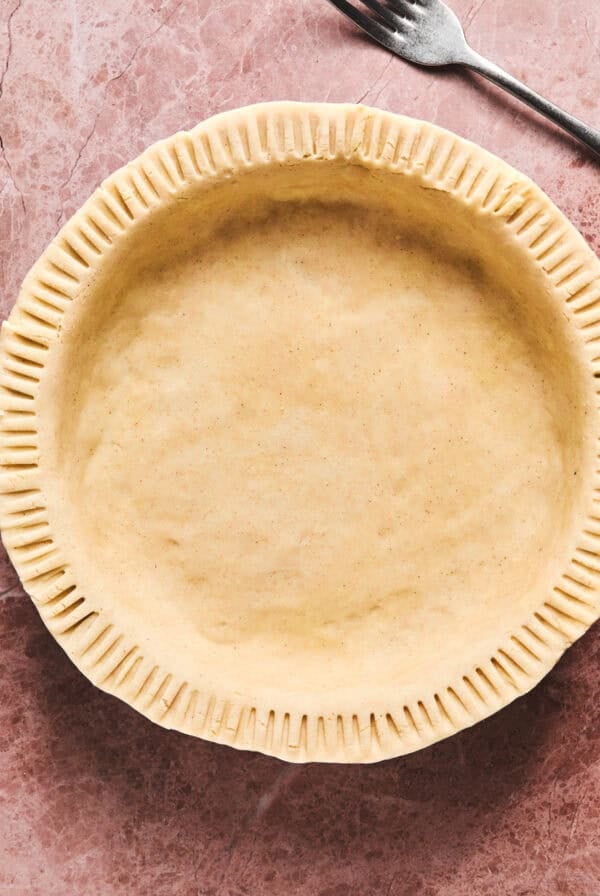
- Make the Crust: To make the Oreo cookie crust, stir together all the ingredients and press into a high-sided 9” springform pan lined with a round of baking parchment. This is best done with the bottom of a measuring cup. You want to get the crust nice and compacted, covering the bottom of the pan in an even layer.
- Preheat: Pre-heat the oven to 325F and place a large baking dish of water in the bottom of the oven to heat up also.
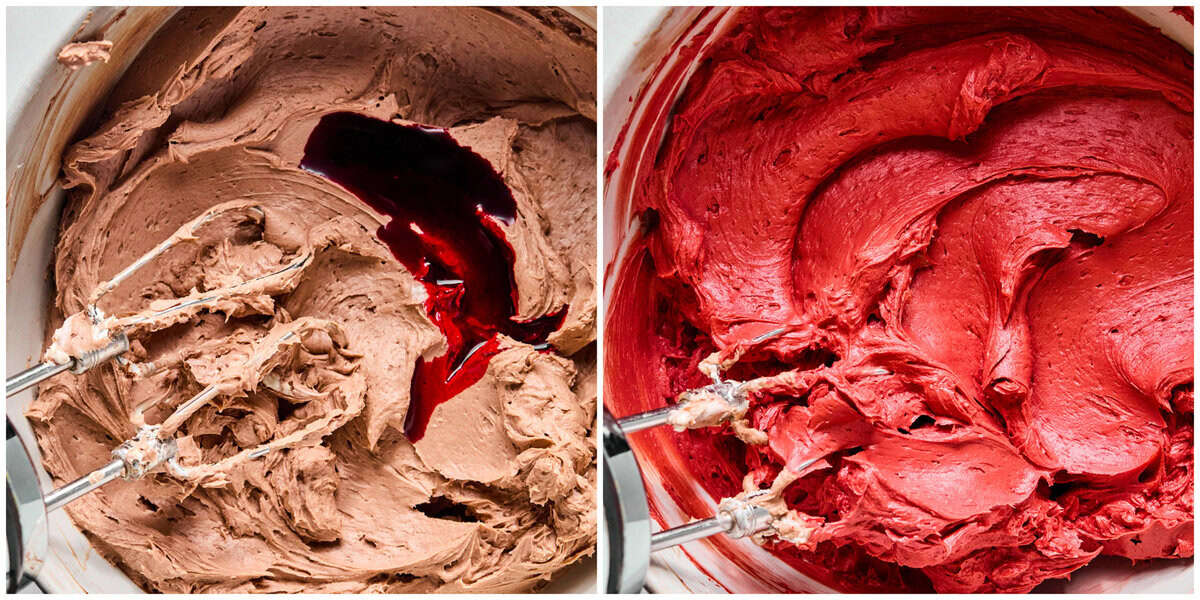
- Mix the Cream Cheese: Using a stand mixer with the beater attachment or an electric hand mixture, beat together the cream cheese, sugar and vanilla, until smooth and creamy. Then scrape down the sides and beat in the cocoa powder.
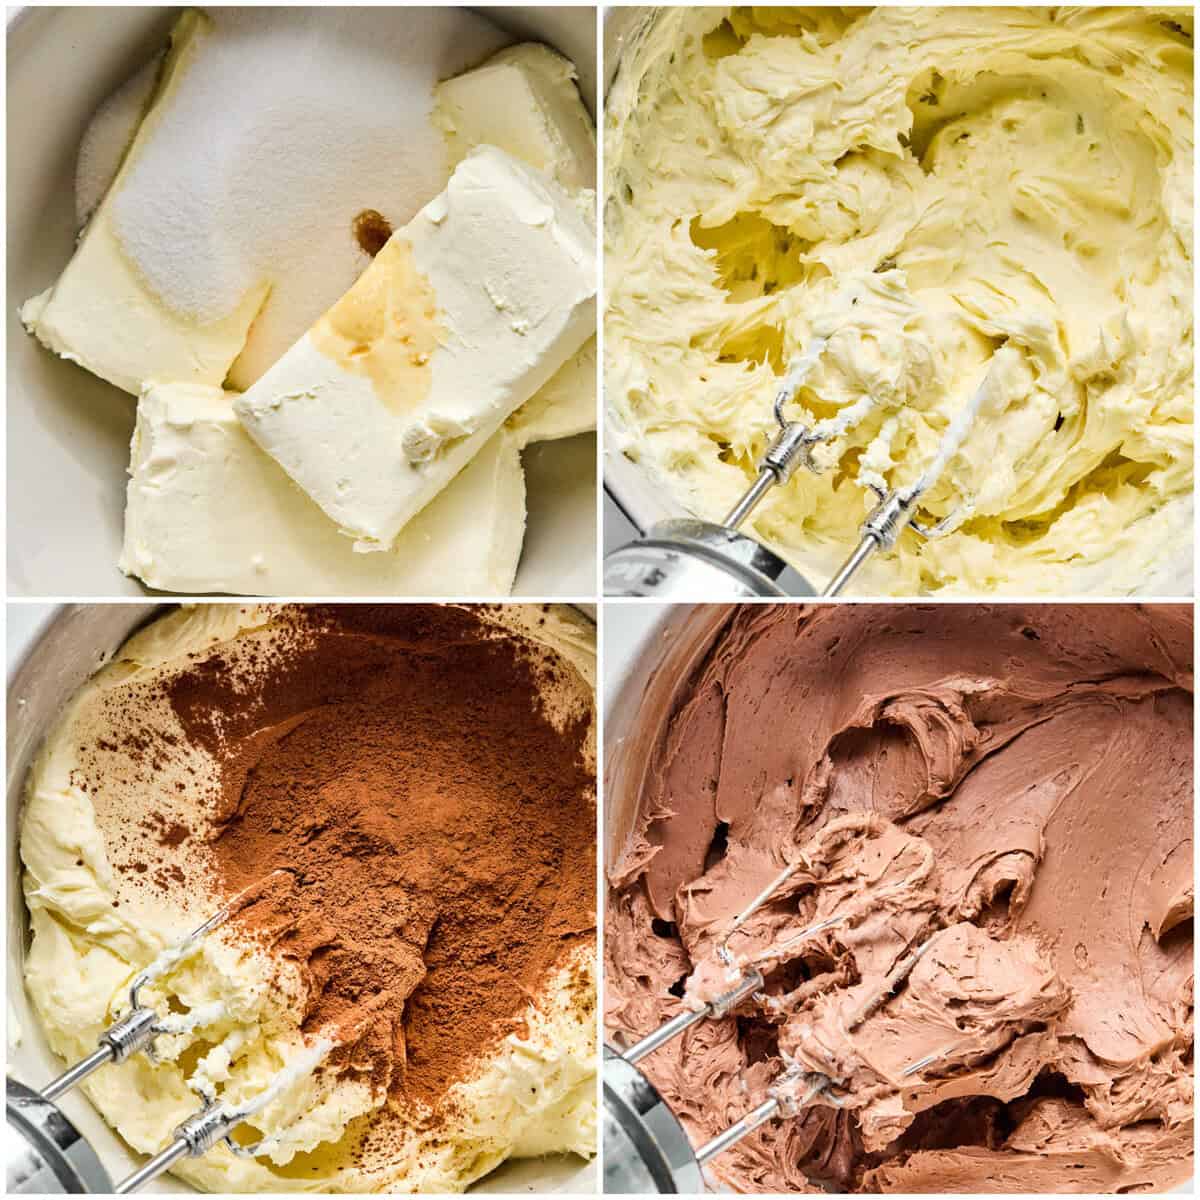
- Add the Red Food Coloring: Scraping down the sides again, add 1 tbsp of the red food coloring, and beat to combine. The shade of Red given will depend on your brand; add the remaining 1 tbsp 1/2 tbsp at a time until you achieve the desired color batter, which is true to shade when baked.
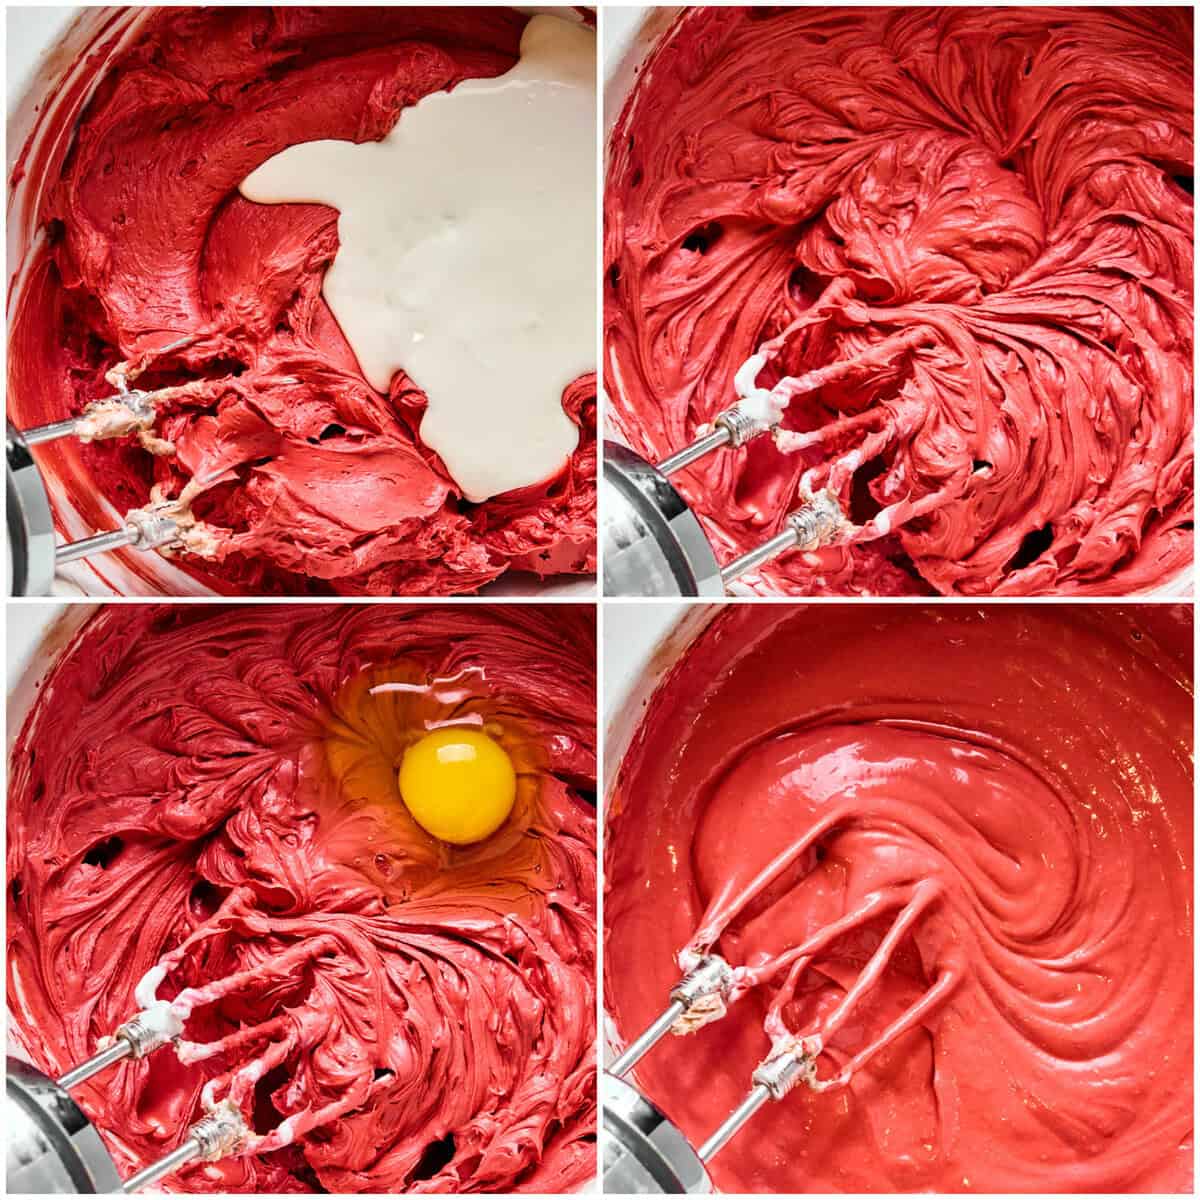
- Add Eggs: Scrape down the sides, and beat in the heavy cream until only just combined. Do the same with the eggs, one at a time, scraping down the sides between each egg. Switch to a spatula after the last egg to make sure the mixture is combined, adding a pinch of kosher salt. Over-beating the mixture will lead to a cracked cheesecake!
- Bake: Scrape the mixture into the prepared pan, smoothing the top the best you can. Bake in the middle of the oven above the water bath for 1 hour 15 minutes. Don’t open the oven, which can also cause the cheesecake to crack!
- Cool Slowly & Chill: Crack the oven door and allow the cheesecake to cool for 45 minutes in the oven before transferring it to the refrigerator to chill for at least 4 hours, or overnight.

Expert Tips
- Don’t rush the color. Red food coloring varies by brand, so start with less and build up slowly. The batter’s color will deepen slightly as it bakes, so aim just a touch brighter than your final goal.
- Mix gently once the eggs go in. Eggs trap air easily, and too much air leads to cracks. Mix just until combined and switch to a spatula at the end to finish folding everything together.
- Use the water bath trick (without the hassle). Placing a pan of water on the rack below the cheesecake adds moisture to the oven without wrapping the pan in foil. It’s simple, effective, and my much less stressful trick to the perfect cheesecake.
- Chill completely before slicing. Cheesecake needs time to fully set. Chilling for at least four hours (overnight is best) ensures clean slices and the perfect creamy texture.
Variations & Substitutions
- Cream cheese frosting topping: Spread or pipe a light layer on top after chilling for a classic red velvet finish and an extra sweet treat!
- Chocolate ganache drizzle: For extra drama (and chocolate lovers).
- Gluten-free: Use gluten-free chocolate sandwich cookies for the crust!
- Natural coloring: Beet-based food coloring works, though the color may be slightly darker.
FAQs
This recipe for red velvet cheesecake is lightly chocolatey, tangy, and ultra-creamy. It’s richer than red velvet cake but still balanced and not overly sweet.
Not exactly. Red velvet uses a small amount of cocoa powder, giving it a subtle chocolate flavor without tasting like full chocolate cake. It is also known for being tangy, which usually comes in the form of buttermilk or vinegar. The tangy flavor in red velvet cheesecake comes from the cream cheese!
Use a sharp knife dipped in hot water, wiping it clean between each slice. This makes a huge difference for neat, bakery-style cuts!
More Dessert Recipes
- Carrot Cake Cupcakes with Cream Cheese Frosting – Moist, spiced cupcakes with tangy frosting!
- Spice Cake with Brown Sugar Frosting – Warm spices, cozy cake, dreamy frosting.
- Cream Cheese Lemon Bars – My viral recipe everyone asks for on repeat!
More Cheesecake Recipes
- Caramel Cheesecake – Rich, creamy cheesecake drenched in caramel.
- No Bake Cheesecake – No oven, no stove, just delicious!
- Cinnamon Roll Cheesecake Bars – Swirled, creamy, cinnamon-sugar bliss in bar form!
- Mini Turtle Cheesecakes – Caramel, pecans, creamy cheesecake – the best combo!
When you make this recipe, snap a photo and tag me on social – I love connecting with you and seeing what you’re up to in the kitchen!
Red Velvet Cheesecake
Ingredients
For the Oreo Cracker Crust
- 1 ½ cups crushed Oreo cookies
- ¼ cup melted butter
- ⅕ tsp kosher salt
For the Red Velvet Cheesecake
- 2 lb cream cheese, at room temperature
- 1 cup sugar
- 2 tsp vanilla
- ¼ cup cocoa powder, sifted
- 1-2 tbsp liquid red food coloring
- ¾ cups heavy cream, at room temperature
- 4 large eggs, at room temperature
- kosher salt, to taste
Instructions
- To make the Oreo cookie crust, stir together all the ingredients and press into a high-sided 9” springform pan lined with a round of baking parchment. This is best done with the bottom of a measuring cup. You want to get the crust nice and compacted, covering the bottom of the pan in an even layer.
- Pre-heat the oven to 325F and place a large baking dish of water in the bottom of the oven to heat up also.
- Using a stand mixer with the beater attachment or an electric hand mixture, beat together the cream cheese, sugar and vanilla, until smooth and creamy. Then scrape down the sides and beat in the cocoa powder.
- Scraping down the sides again, add 1 tbsp of the red food coloring, and beat to combine. The shade of red given will depend on your brand; add the remaining 1 tbsp 1/2 tbsp at a time until you achieve the desired color batter, which is true to shade when baked.
- Scrape down the sides, and beat in the heavy cream until only just combined. Do the same with the eggs, one at a time, scraping down the sides between each egg. Switch to a spatula after the last egg to make sure the mixture is combined, adding a pinch of kosher salt. Over-beating the mixture will lead to a cracked cheesecake!
- Scrape the mixture into the prepared pan, smoothing the top the best you can. Bake in the middle of the oven above the water bath for 1 hour 15 minutes. Don’t open the oven, which can also cause the cheesecake to crack!
- Crack the oven door and allow the cheesecake to cool for 45 minutes in the oven before transferring it to the refrigerator to chill for at least 4 hours, or overnight.
Notes
- Don’t rush the color. Red food coloring varies by brand, so start with less and build up slowly. The batter’s color will deepen slightly as it bakes, so aim just a touch brighter than your final goal.
- Mix gently once the eggs go in. Eggs trap air easily, and too much air leads to cracks. Mix just until combined and switch to a spatula at the end to finish folding everything together.
- Use the water bath trick (without the hassle). Placing a pan of water on the rack below the cheesecake adds moisture to the oven without wrapping the pan in foil. It’s simple, effective, and my much less stressful trick to the perfect cheesecake.
- Chill completely before slicing. Cheesecake needs time to fully set. Chilling for at least four hours (overnight is best) ensures clean slices and the perfect creamy texture.
Nutrition
Nutrition information is automatically calculated, so should only be used as an approximation.


This is pure delicious craziness!! Wow! Looks like a recipe straight from heaven.
You are the sweetest, Kristy! Thanks! 🙂
Hi
These look delicious but I don’t understand the frozen cream cheese. How does the cream cheese become part of the batter if they’re frozen ½ inch pieces? Doesn’t it need to ‘blend’ in with all of the batter? (pardon me if I overlooked something)
Hi, the cream cheese is frozen because it is intended to NOT be blended with the batter. The idea is to get cheesecake “bites” throughout the pancake. As you can see in the photographs, the cream cheese is only in sporadic places through the pancakes, not blended into the batter. Freezing the cream cheese will allow you to enjoy those individual bites of cheesecake. Hope you enjoy these and this clears up your question!
How much milk or half and half do you use in the icing?
Start with 3-4 tablespoons, mix, and add 1 tablespoon at a time until you reach a pourable consistency 🙂
I made these for VDay and the icing was really grainy from the sugar. Any suggestions? It tasted really good, but the texture was off. Great recipe though. Best pancakes I have ever had.
Hi Adam! I’m so glad you enjoyed these pancakes, they’re so sweet and delicious it’s practically like eating dessert for breakfast! With the icing, it may help to use a hand mixer on high speed for 30-60 seconds and add a little milk/half and half/or heavy cream to help smooth things out. 🙂
I want these on my table right now. They look so delicious. My mouth is watering at the pictures!
Oh my goodness! These look amazing:)
i’ve always wanted to try these. they look great!