Easy No Bake Peanut Butter Bars
This post may contain affiliate links. Please read our disclosure policy.
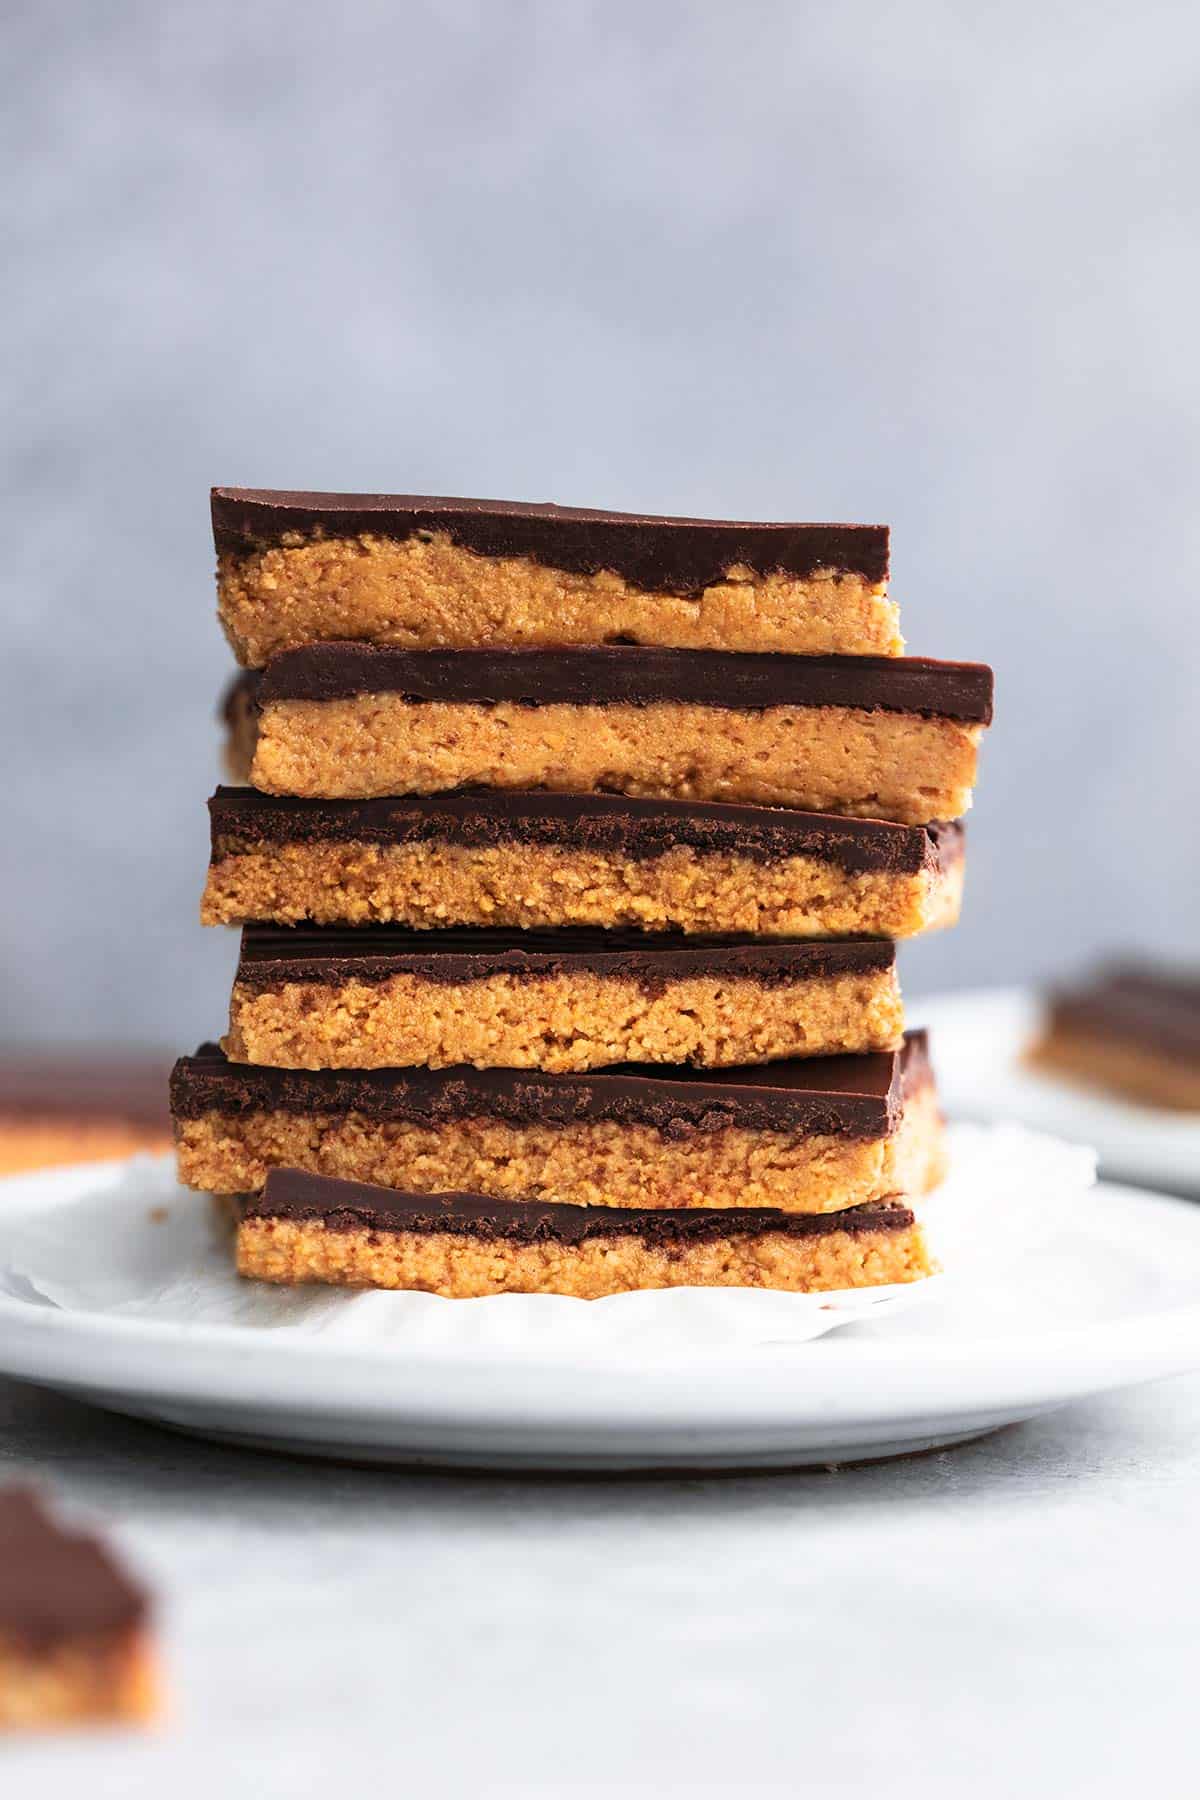
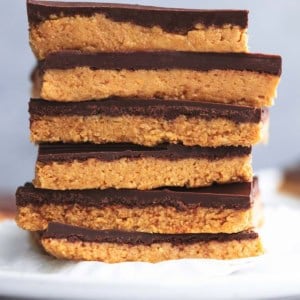
These No-Bake Peanut Butter Bars are incredibly easy to make with just 15 minutes prep and no baking involved! These are addicting!
Looking for more no-bake desserts? Then you’ve come to the right place! Try my recipes for No Bake Churro Krispie Bars, 3 Ingredient Old Fashioned Potato Candy, No Bake Peanut Butter Pie, and No Bake Frozen Peanut Butter Pie.
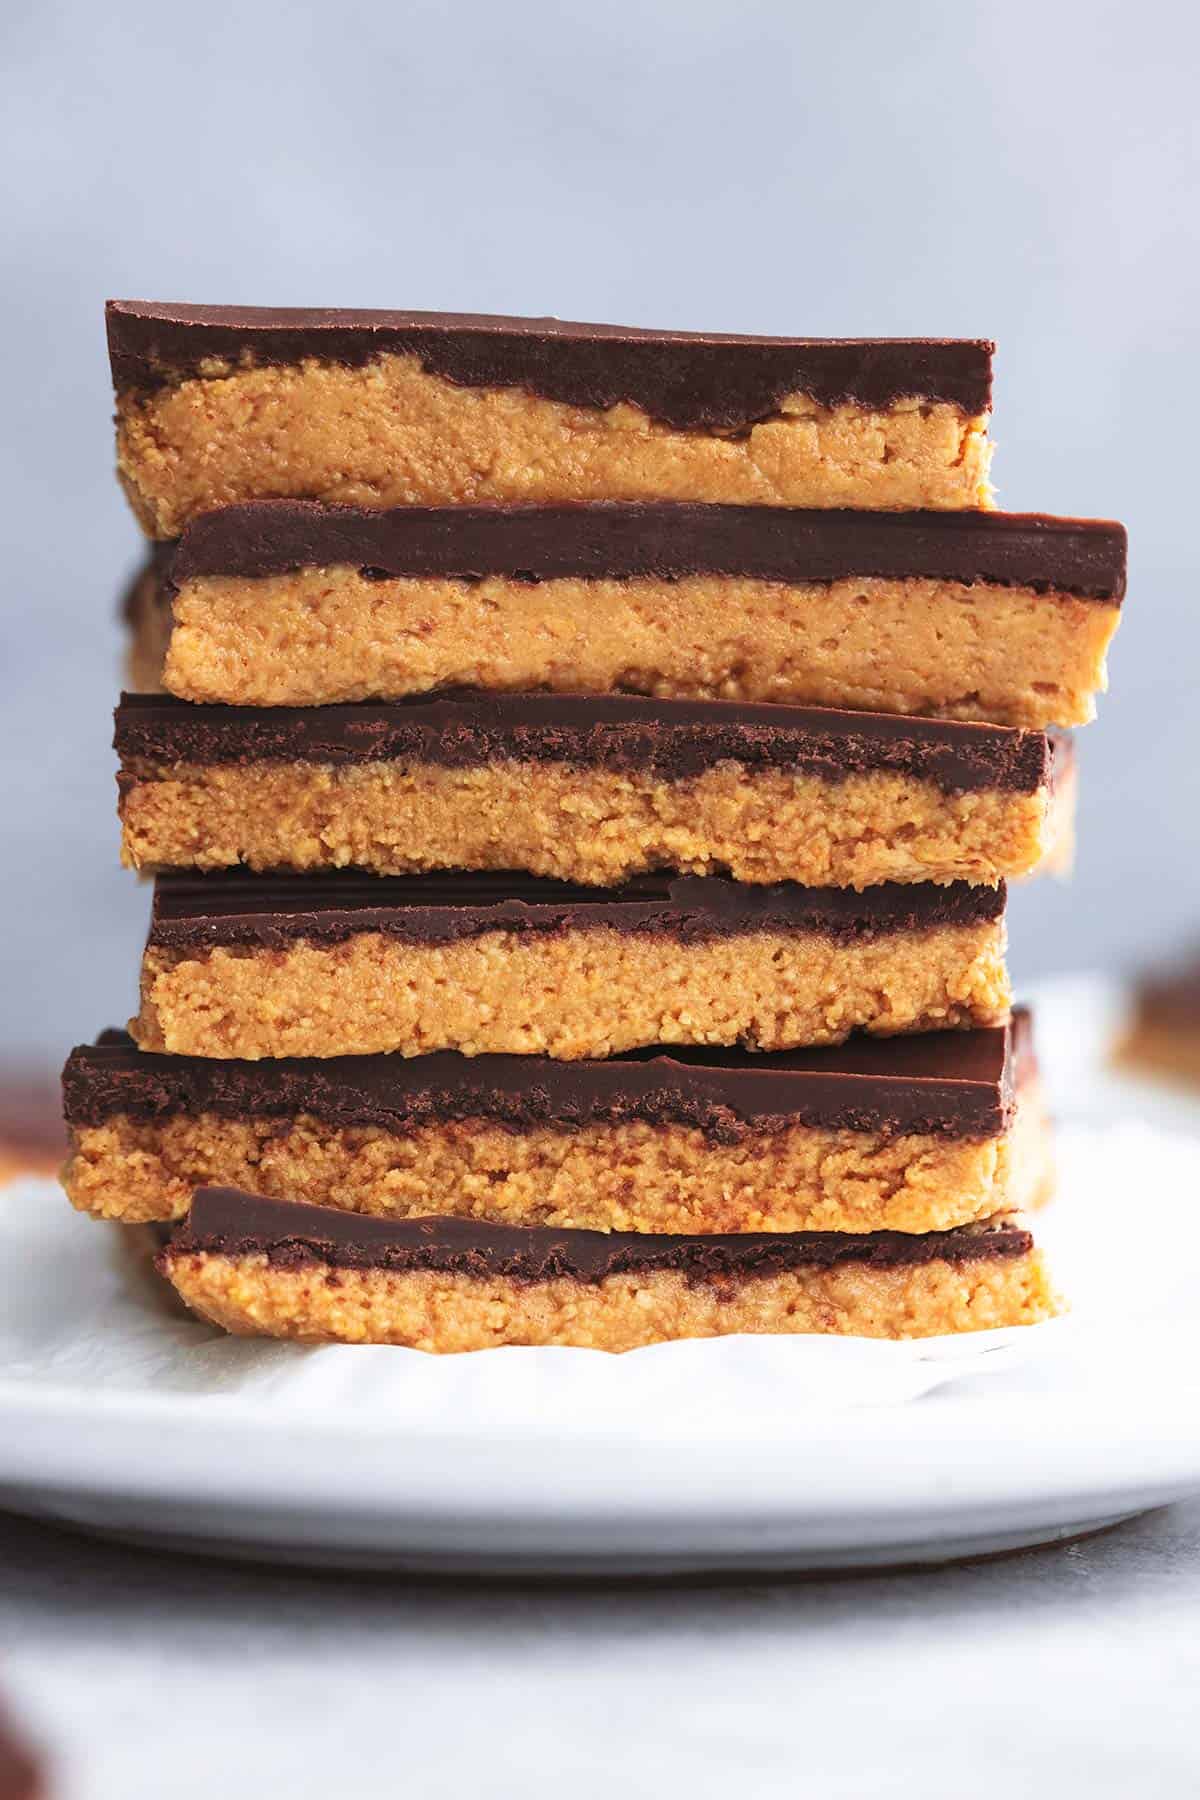
These peanut butter bars are rich too but so much easier to make than even the simplest fudge recipe. These are no-bake and come together in less than 20 minutes. The best part is the chocolate on top. The secret is that it isn’t just chocolate, it’s chocolate and peanut butter all swirled together into one splendid topping you can’t get enough of. Don’t you just want to sink your teeth into these bars just thinking about them? The hardest part is trying to not to eat them all in one sitting!
Why It Works
No baking – I love to bake, don’t get me wrong. But when I can eliminate a step to baking (or not turn the oven on during these hot summer days) I’m all in. You just mix all together and let set. That’s it!
Peanut butter – I’m a peanut butter addict. It goes so great in all the desserts and this one is no exception. The combo of peanut butter and chocolate together. That’s the stuff dreams are made of right there.
Portable – I’m not sure if it’s a good thing or bad thing that these no-bake bars are portable. I mean, it’s great for when you need to take a dessert to a potluck or picnic but bad when you realize you can just grab one (or two) on your way out the door. Know what I mean?
Simple ingredients – Oats, butter, graham crackers, chocolate, peanut butter, and that’s just about it in these terrific peanut butter chocolate bars. And, if you don’t have everything in your pantry or fridge, all of these ingredients are easy to find at your local grocery store.
Here’s How You Make It
First of all, step away from your oven; you’re not going to need it.
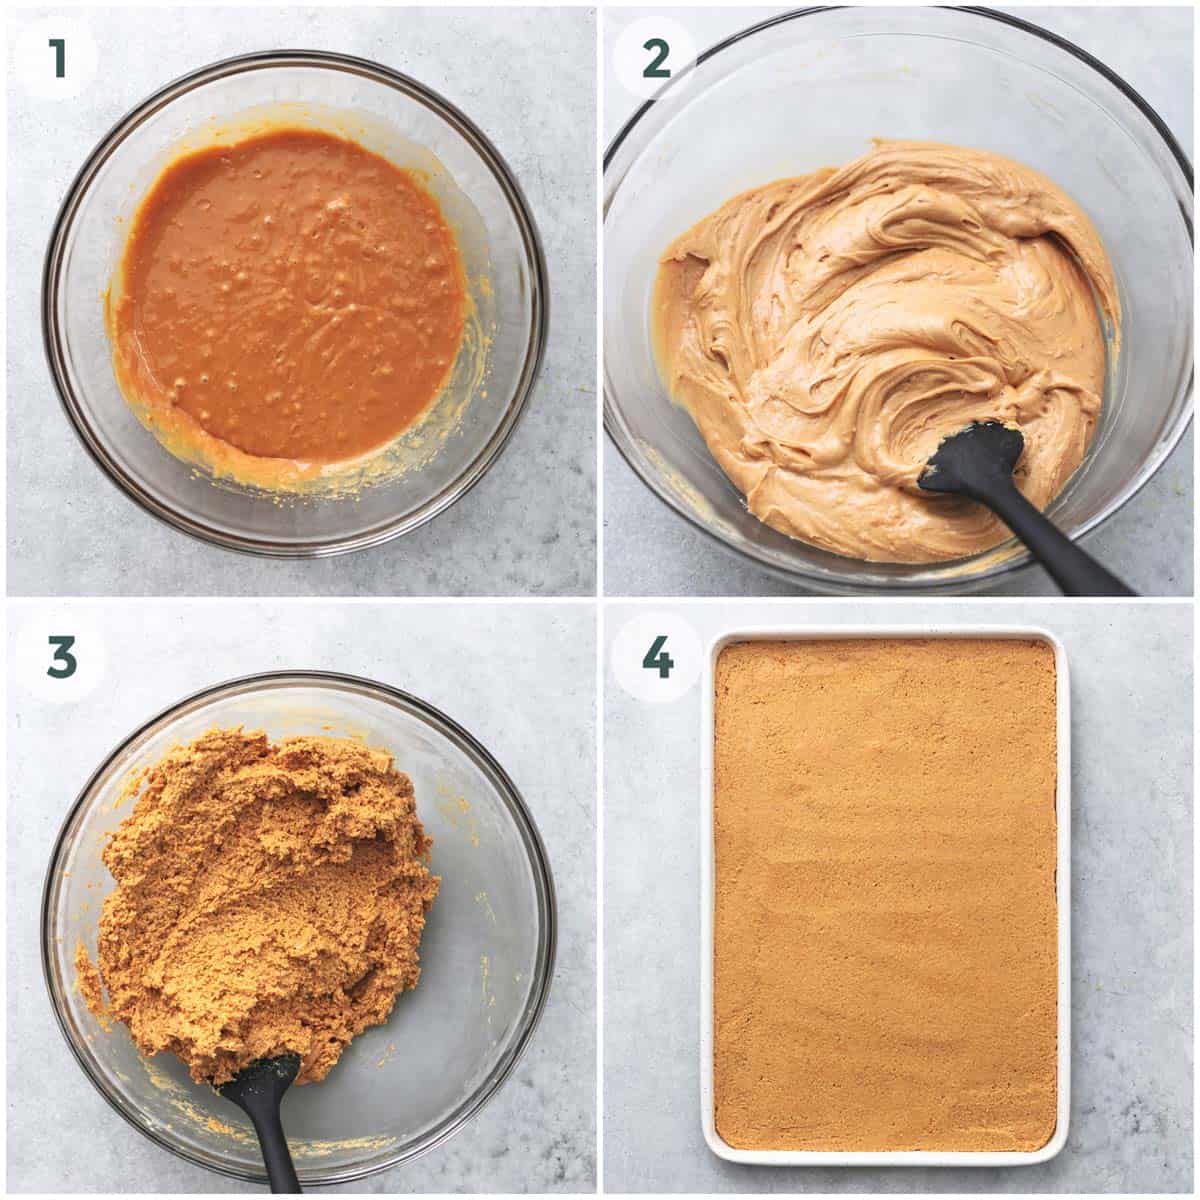
- Combine the melted butter, graham cracker crumbs, powdered sugar, oats, and a cup of peanut butter into a large bowl. Mix it all together and press the dough into a 9×13 inch pan. (photos 2-4)
- Combine the chocolate chips and the rest of the creamy peanut butter into a microwave-safe bowl. Microwave on high for 1 minute. Then stir the mixture and put back into the microwave for 20 second increments, taking out, stirring, and putting back in until the chocolate is melted and smooth. (photo 1)
- Spread the melted chocolate/peanut butter mixture over the bottom crust layer in the pan. Allow it to cool completely before cutting into bars. They can either cool at room temperature or you can pop them in the fridge for quicker results. (photos 5-6)
- Store at room temperature in an airtight container. (not pictured)

Customization Ideas
Want to mix up these no-bake bars? Let’s do it.
- Use chocolate graham crackers for an extra-chocolatey bar.
- After pouring the chocolate onto the crust, let it dry/cool for about 10-15 minutes, then add sprinkles to the top. Press in just a bit to make sure they stick.
- OR instead of sprinkles, you could add on more chocolate chips, white chocolate chips, or another kind of chip/sprinkle you like.
- Other topping ideas include dried coconut flakes, chopped peanuts, or chopped walnuts.
- Give your bars a little crunch by adding a layer of Rice Krispies on top of the crust before pouring on your chocolate.
- Add a layer of dehydrated fruit (raspberries, strawberries, blueberries) to the crust layer before pouring the chocolate. I recommend this over dried fruit, as it will be less chewy but still flavorful.
Expert Tips
- Oats should be old fashioned rolled oats, not instant oats!
- Make sure to check that chocolate in the microwave every 20 seconds. If you don’t stir in intervals, it can burn and won’t be nearly as smooth.
- To cut the bars evenly, I make scoring marks along the sides to make sure I am cutting at equal intervals, then press the knife down to cut through the chocolate, then gently pull it toward you, taking care not to break the chocolate on top if you can.
- These bars will keep in the fridge for up to one week in a covered container.
More Delicious Desserts
- No Bake Cheesecake
- Cream Cheese Lemon Bars
- Super Soft Peanut Butter Cookies
- No Bake Churro Krispie Bars
Did you make these super easy No Bake Peanut Butter Bars? YAY! Please rate the recipe below!
Easy No Bake Peanut Butter Bars
Ingredients
- 1 cup butter or margarine, melted
- 2 cups graham cracker crumbs
- 1 cup rolled oats, see note
- 2 ⅓ cups powdered sugar
- 1 ½ cups creamy peanut butter, divided
- 1 ½ cups semisweet chocolate chips
Instructions
- Combine melted butter, graham crack crumbs, rolled oats, powdered sugar, and 1 cup peanut butter in a large bowl. Mix well. Press dough into a 9×13 inch pan.
- In a microwave safe bowl combine chocolate chips and remaining 1/2 cup creamy peanut butter. Microwave on high for 1 minute. Stir. Return to microwave and heat for 20 seconds, stir and repeat process until chocolate is melted and smooth.
- Spread melted chocolate/peanut butter over bottom layer in the pan. Allow to cool completely before cutting into bars. (you can allow them to cool at room temperature or in the fridge for quicker results) Store at room temperature in airtight container.
Notes
- *Oats should be old fashioned rolled oats, not instant oats!
- Make sure to check that chocolate in the microwave every 20 seconds. If you don’t stir in intervals, it can burn and won’t be nearly as smooth.
- To cut the bars evenly, I make scoring marks along the sides to make sure I am cutting at equal intervals, then press the knife down to cut through the chocolate, then gently pull it toward you, taking care not to break the chocolate on top if you can.
- These bars will keep in the fridge for up to one week in a covered container.
Nutrition
Nutrition information is automatically calculated, so should only be used as an approximation.
Recipe adapted from All Recipes.


Awesome recipe! I love them and everyone raves about them! Easy to throw together!
These we’re delicious and everyone loves them. Taste like Reese’s pieces. Best part no cooking.